
The Lasso Tool - L:
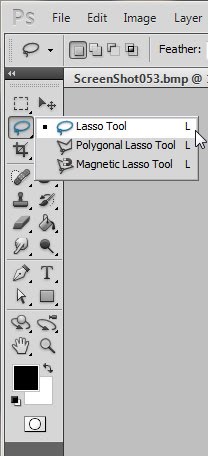
Extract anything from images by carefully articulating around the areas you'd like to extract. Notice this tool isn't capable of precision, there are alternative methods that are far more precise at extracting things from images.
Extract With a Lasso:

Photoshop - Lasso Tool Options
The options bar for the lasso tool holds a few options you may already be familiar with. The beginning four icons allow for the addition and subtraction of a a selection.Skipping past those icons, you find an input field allowing for the feathering of the selection as it is removed and again, an anti-aliased check box.Lasso Tool Options Box:

Photoshop - Polygonal Lasso Tool
The polygonal lasso tool exists as a secondary tool to the original lasso tool. Press shift+L to alternate through the lasso tools until you have the polygonal lasso tool selected. This tool is great for extracting pieces of photos that have straight edges or a semi polygonal shape to them.Polygonal Lasso Tool:

Select Polygonal Shapes:

There are no new options for the polygonal lasso tool. The options box reads the same as with the original lasso tool.
This tool will lasso any polygon shape by clicking specific points around an image. Photoshop will draw in straight lines from point to point as you click around the image.
Photoshop - Magnetic Lasso Tool
Perhaps more useful, the magnetic lasso tool exists as an additional secondary tool to the lasso tool. Select this tool by pressing shift+L and toggling through until the selector rests on the magnetic lasso tool selection. This tool is unique as it identifies a contrast in an image and is draw to that contrasting point creating a selection as you briefly drag the mouse about the object of desire.The Magnetic Lasso Tool:
How it works is, as you drag the mouse photoshop places points of selection about the image. At any time clicking along the edge will place a point. This way you can sort of help Photoshop along with the selection. Sometimes these points placed by Photoshop can get out of hand, pressing Delete - Del will undo misplaced points and you may continue dragging the mouse as Photoshop makes the selection for you.
Magnetic Selection:

Magnetic Lasso Tool Options:

Next is the contrast edge amount which is a percentage that is taken into consideration as you drag the mouse cursor about the selection. Photoshop will uses this percentage to help calculate the selection. Adjust this setting if the width adjustment doesn't cut it.
The frequency box determines how often points are placed as you continue to drag the mouse cursor. An integer between 1 and 100 is required. A setting of 100 is the highest setting creating pin points faster than you can delete them.
No comments:
Post a Comment